My first split mechanical keyboard
I was a hunt and peck typer for a very long time. Almost a year back, I decided to properly learn touch typing for good. Before that, my typing speed was something like 40-45 word per minutes (WPM) at best. In general I didn’t believe in fast typing would improve my general coding/typing and I always thought my ability to think is not any faster than my fingers anyways. But this low of a rate is abysmal, it was reducing my throughput especially when chatting with people and constantly moving my head to look for the keyboard is distracting. Finally I accepted that writing at least 60 WPM is a must for what I do on a daily basis.
At first I started practicing on my daily driver keyboard, forcing myself not to look at the keys whatever the case. After around 6 months my speed went from my worst average of around 35 with the new method to ~60. Around that time, I started looking for a split ergonomic keyboard. After resisting the urge to go into the mechanical keyboard hobby for a long time, I finally ordered my first Corne PCB. It was a pretty straightforward process with the gerber files already released.
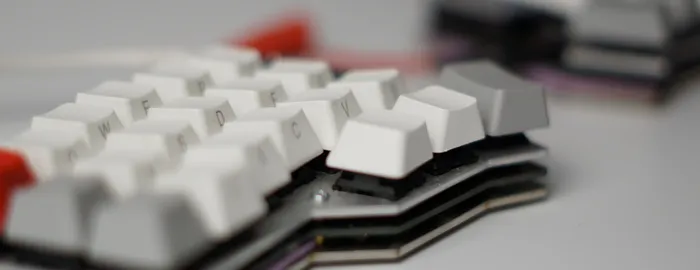
I picked this keyboard as I didn’t know what to expect and I wanted to start small to reduce cost. It has a columnar layout, which was another challenge to get used to after learning touch typing on a staggered keyboard but I got used to it an reached 65+ WPM in around three months with a much acceptable dip at ~50 WPM. I never thought I could get used to such a low number of keys (42 in total to be specific) and using multiple layers for various stuff. It turned out easier than I thought but still a challenging process. The good thing is now I have a fully programmable keyboard thanks to QMK. Bad thing is I am very much used to it and going back to a regular keyboard is very difficult at this point.
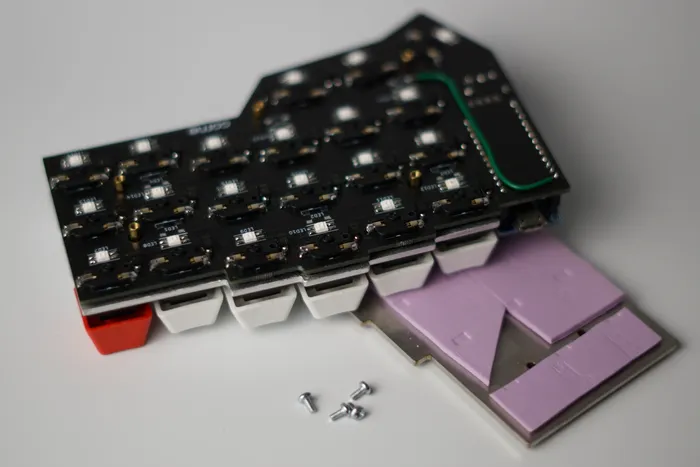
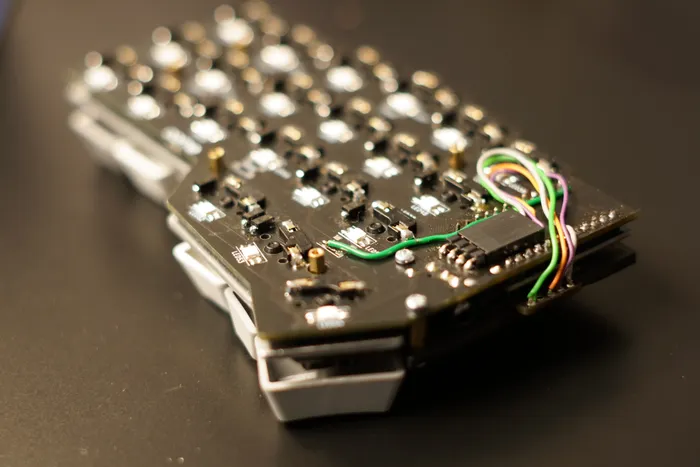
The top and bottom plates were cut by a great laser cutting service named CADcut and I used steel for the bottom plate to give the keyboard weight and stability. Once I received the PCB, I have painstakingly soldered everything except for the underglow LEDs, which I didn’t need because of the opaque bottom plate. The LEDs are connected in a chain where the data output from one feeds into the other, allowing for a pseudo-individual addressing. They work like a shift register where each LED reads the first data it sees on the line and passes through the rest. I bypassed the undeglow LED’s data line with a bodge wire and created a custom setup for my hardware “revision” with fewer LEDs.
For the initial experimentation with multiple layers, VIA was an indispensible tool. It is an online tool that can update the key layout on the fly using WebHID API. It enabled me to customize my layout without repeatedly flashing the keyboard. Because I want both sides to act as a USB connection point, I needed to set handedness with EE_HANDS. When this is enabled, the handedness is read from the EEPROM, which can be set by QMK Toolkit or the qmk cli.
Then, building the firmware was straightforward when you have the required toolchain installed. In my case I used QMK_MSYS on Windows. I even updated my vscode configuration to add support for the build environment:
  "terminal.integrated.profiles.windows": {
    "QMK": {
      "path": "C:\\QMK_MSYS\\usr\\bin\\bash.exe",
      "args": ["--login", "-i"],
      "env": {
        "MSYSTEM": "MINGW64",
        "CHERE_INVOKING": "1"
      }
    }
  },
With this setup, I was able to quickly start a qmk enabled shell from within vscode. When you first install it, you can initialize by running qmk setup. When you do this within your qmk_firmware fork, it just recognizes this and runs a healthcheck. I have created my keymap in keyboards\crkbd\keymaps\naci and my base config in keyboards\crkbd\rev_naci. You can see my latest keymap on GitHub. Then while still in the qmk shell, I build my custom configuration by running;
qmk compile -kb crkbd -km naciThe brains of each half is an atmega32u4, which can act like a USB HID device. For simplicity I just use QMK Toolbox to flash the firmware. After building it, pressing the reset button on the MCU brings the bootloader to a serial-flash mode and the host software will automatically flash it if you enable the auto-flash feature.
Pointing device
Moving my hand over to the mouse and back is still something that is both discomforting and distracting. If only there was a mouse at my fingertips. Look no further, I ordered a Pimoroni Trackball. It has a standard I2C connection and is really easy to integrate, QMK has the driver already. I just needed to connect it to the unused OLED port with a pin header on the bottom of the PCB to save some space, thus keeping the 3D printed plate low on the top side.
Then it is a matter of setting up the driver in rules.mk & config.h:
POINTING_DEVICE_ENABLE = yes
POINTING_DEVICE_DRIVER = pimoroni_trackball
#ifdef POINTING_DEVICE_ENABLE
#define SPLIT_POINTING_ENABLE
#define POINTING_DEVICE_RIGHT
#define POINTING_DEVICE_ROTATION_90
// Enable the mouse layer whenever I touch the trackball:
#define POINTING_DEVICE_AUTO_MOUSE_ENABLE
#endifMore customization
QMK comes with a lot of builtin customization options. There are a lot of cool stuff you can do such as MT(MOD_LCTL, KC_SPC), which makes a key act like the “left control” when the key is held but “space” when tapped. Enabling the RGB matrix system, you have a collection of LED effects to choose from in minutes (not considering countless hours I spent to make it work in the first place😄).
# rules.mk
RGB_MATRIX_ENABLE = yes
RGB_MATRIX_DRIVER = ws2812
// config.h
#ifdef RGB_MATRIX_ENABLE
#define ENABLE_RGB_MATRIX_CYCLE_PINWHEEL
#define ENABLE_RGB_MATRIX_SOLID_REACTIVE_SIMPLE
#define RGB_MATRIX_STARTUP_MODE ENABLE_RGB_MATRIX_SOLID_REACTIVE_SIMPLE
#endifAmong other things I did; using the trackball as a scroll when some layer modifier is pressed and changing the pointer’s LED color based on the active layer. QMK defines its core callbacks as weak references, which then you can override in the user code by defining it as something useful. As an example, I override layer_state_set_user at link time as;
layer_state_t layer_state_set_user(layer_state_t state) {
#ifdef POINTING_DEVICE_ENABLE
    if (is_keyboard_left()) return state;
    switch (get_highest_layer(state)) {
        case LAYER_MOUSE:
            pimoroni_trackball_set_rgbw(0, 0, 0, 255);
            break;
        // ...
    }
#endif
    return state;
}
The above code works perfectly fine when the USB is connected to the right hand side of the keyboard where the trackball resides. For some unknown reason though I couldn’t figure out a way to make it work when the USB is connected to the other half even with SPLIT_LAYER_STATE_ENABLE defined. Without the is_keyboard_left() check, accessing the I2C was breaking some functionality on the left half - I suspect due to it getting timed out and affecting some timings. I expect the right half to change the LED color when the layer information changes but it refused to work, so I abandoned this for now.
Conclusion
It was a fun project, a new hobby and a new opportunity for me to write, which I should definitely want to do more. The most difficult part with the 21 key Corne was getting used to the non-existant ctrl key. I am now using my thumb on the ctrl key instead but it was the most persistent muscle memory for me for some reason. Additional things I want to do are 3D printing a new top case that is covering the sides to prevent light spill. Also my top plate is too thick to properly attach the Cherry switches, this will also fix it. Pimoroni trackball’s resolution is not great as a cursor, but I believe I can fix with software in the future considering it works great as a scroll with MacOS’s native scroll acceleration.
Let me know if you have any comments or questions.
Update
After reading qmk codebase further I realized that SPLIT_LAYER_STATE_ENABLE is not working as I would immediately expect. It replicates the layer state (the layer_state variable) across two halves of the keyboard but does not cause events such as layer_state_set_user to trigger on the other half. I ended up implementing the LED color change on housekeeping_task_user by directly reading the global layer state;
void housekeeping_task_user(void) {
#ifdef POINTING_DEVICE_ENABLE
    if (is_keyboard_left()) return;
    // The layer state is syncronized when I enable SPLIT_LAYER_STATE_ENABLE
    switch (get_highest_layer(layer_state)) {
        case LAYER_MOUSE:
            pimoroni_trackball_set_rgbw(0, 0, 0, 255);
            break;
        // ...
    }
#endif
}